BUILD A HANGING KITCHEN KNIFERACK ©
| Free Woodworking Plan Online
|
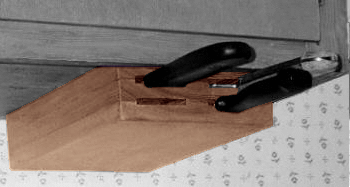
This simple wooden knife rack keeps kitchen knives
sharp and safe. Mounted under the cabinets, it reduces clutter on the countertop and keeps
knives out of reach of small children. It is easy and inexpensive to make following the
woodworking plans below. Simple hand tools are sufficient for this project.
[Scroll down for plans]
Materials
Wood: 3 pcs. -
1"x6"(nominal) x 8"
(actual dimensions: 3/4" x 5-1/2" x 8")
Screws: 4 pcs. - #8 x 1-1/2" flathead wood screws
Sand Paper: #100, #150 and #200 grit.
Stain
(optional) to match kitchen woodwork.
Carpenter's glue
|
Tools
Measuring tape or rule
Marking gauge
Back Saw (or other
hand saw)
Wood chisel
Screw Driver
Clamps
Pencil
Portable hand drill |
| SAFETY: Although the hand tools used for
this project are not especially hazardous, they should be handled
with care. Anticipate potential hazards. Ask yourself: "If it
slips, where will it go ?" |
|
INSTRUCTIONS ( Copyright © 1998/2017 by
J.C.Miller ) |
CAUTION: Always Wear Safety Glasses
When Using Power Tools
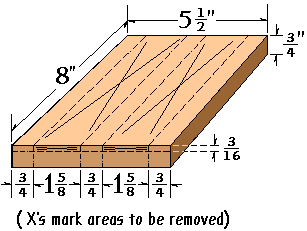
1. Laying out the grooves:
Mark out the lines
on 2 boards as shown with a marking gauge (Dimensions shown in inches).
Mark the areas to be removed with "X"s. (The third board does not have
grooves).
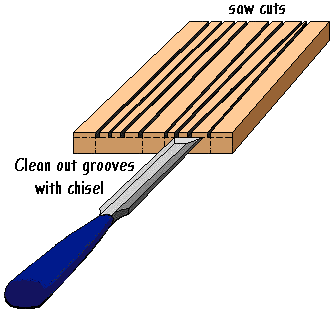
2. Cutting the grooves:
A table saw with dado cutter makes short
work of the grooves, but you can do just as well with a back saw and a
chisel. Make saw cuts just inside the lines on the faces of the boards, to
a depth of 3/16". Make 1 or 2 more saw cuts to the same depth, within each
groove. Remove the wood from the grooves with a chisel. (The inside
surfaces will not show, so the grooves need not be perfectly smooth,
except at the front edge.)
CAUTION: Keep hands out of the path of
the chisel blade.
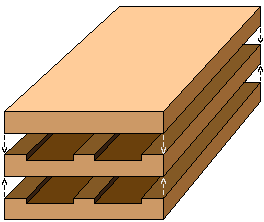
3. Assembly:
Apply glue to the surfaces adjacent
to the grooves and clamp the pieces together as shown. (Woodworking tip:
You may also need to clamp the edges in place to hold the pieces in
alignment while the glue sets.)
4. Finishing:
Sandpaper the sides, ends and bottom
face. Stain, if desired, to match kitchen woodwork.
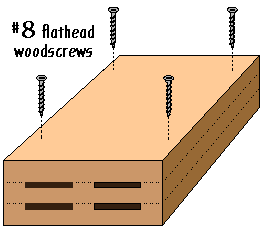
5. Mounting the knife rack under the cabinet:
Trace the outline of the rack onto the lower side of the shelf where it is
to be mounted. Drill 4 shank holes in the shelf about 1/2 inch in from the
outline of the rack. Countersink the shank holes from the top of the
shelf. Holding the rack in place, mark positions of pilot holes in the
rack through the holes in the shelf. Drill pilot holes in the rack. Attach
the rack to the lower side of the shelf with #8 flathead wood screws.
CAUTION: Always wear eye protection
when using a power drill.
Copyright © 1998/2017. J.C.Miller. Feel free to make individual
copies of these woodworking plans for your own use, but not for sale or
distribution. (Updated - 21.Jul.2017)
These plans are published online by Vintage Games Co.
which offers other woodworking plans for sale.
|
